How to take advantage of Budgets in iCash
Budgets - One great feature of iCash is the ability to create a budget.
A budget is basically a kind of projection of how much money you will spend or earn during a period of time in the future. I believe it is highly probable you already have created budgets in some way or another. Indeed, anytime you figure out how much money you will have left at the end of the month after paying your bills, you are creating a budget.
You use budgets to estimate future income and expenses and create "what if?" scenarios. As time goes by, you may create reports to compare actual incomes and expenses with your budget and find deviations. Typically you create a budget for a specified period of time.
At the end of that period, you can then compare your actual expenses and earnings with your predicted budget numbers. This can give you a good measure of the health of your economy.
iCash budgeting is quite straightforward since you can simply take advantage of the data you have already provided as a starting point.
I am talking about the transactions you have added to the software so far. You are probably familiar with Excel, the Microsoft Spreadsheet software; creating sheets, entering historical data, budget numbers, formulas, ...etc... well, the iCash budget editor mostly works like a spreadsheet but with built-in formulas and built-in historical data.
It is a good idea to use budgets before making any major decisions. To ensure you can reach your financial goals, first create a budget and enter all the numbers so you can adjust and rework them as many times as necessary.
Creating a budget
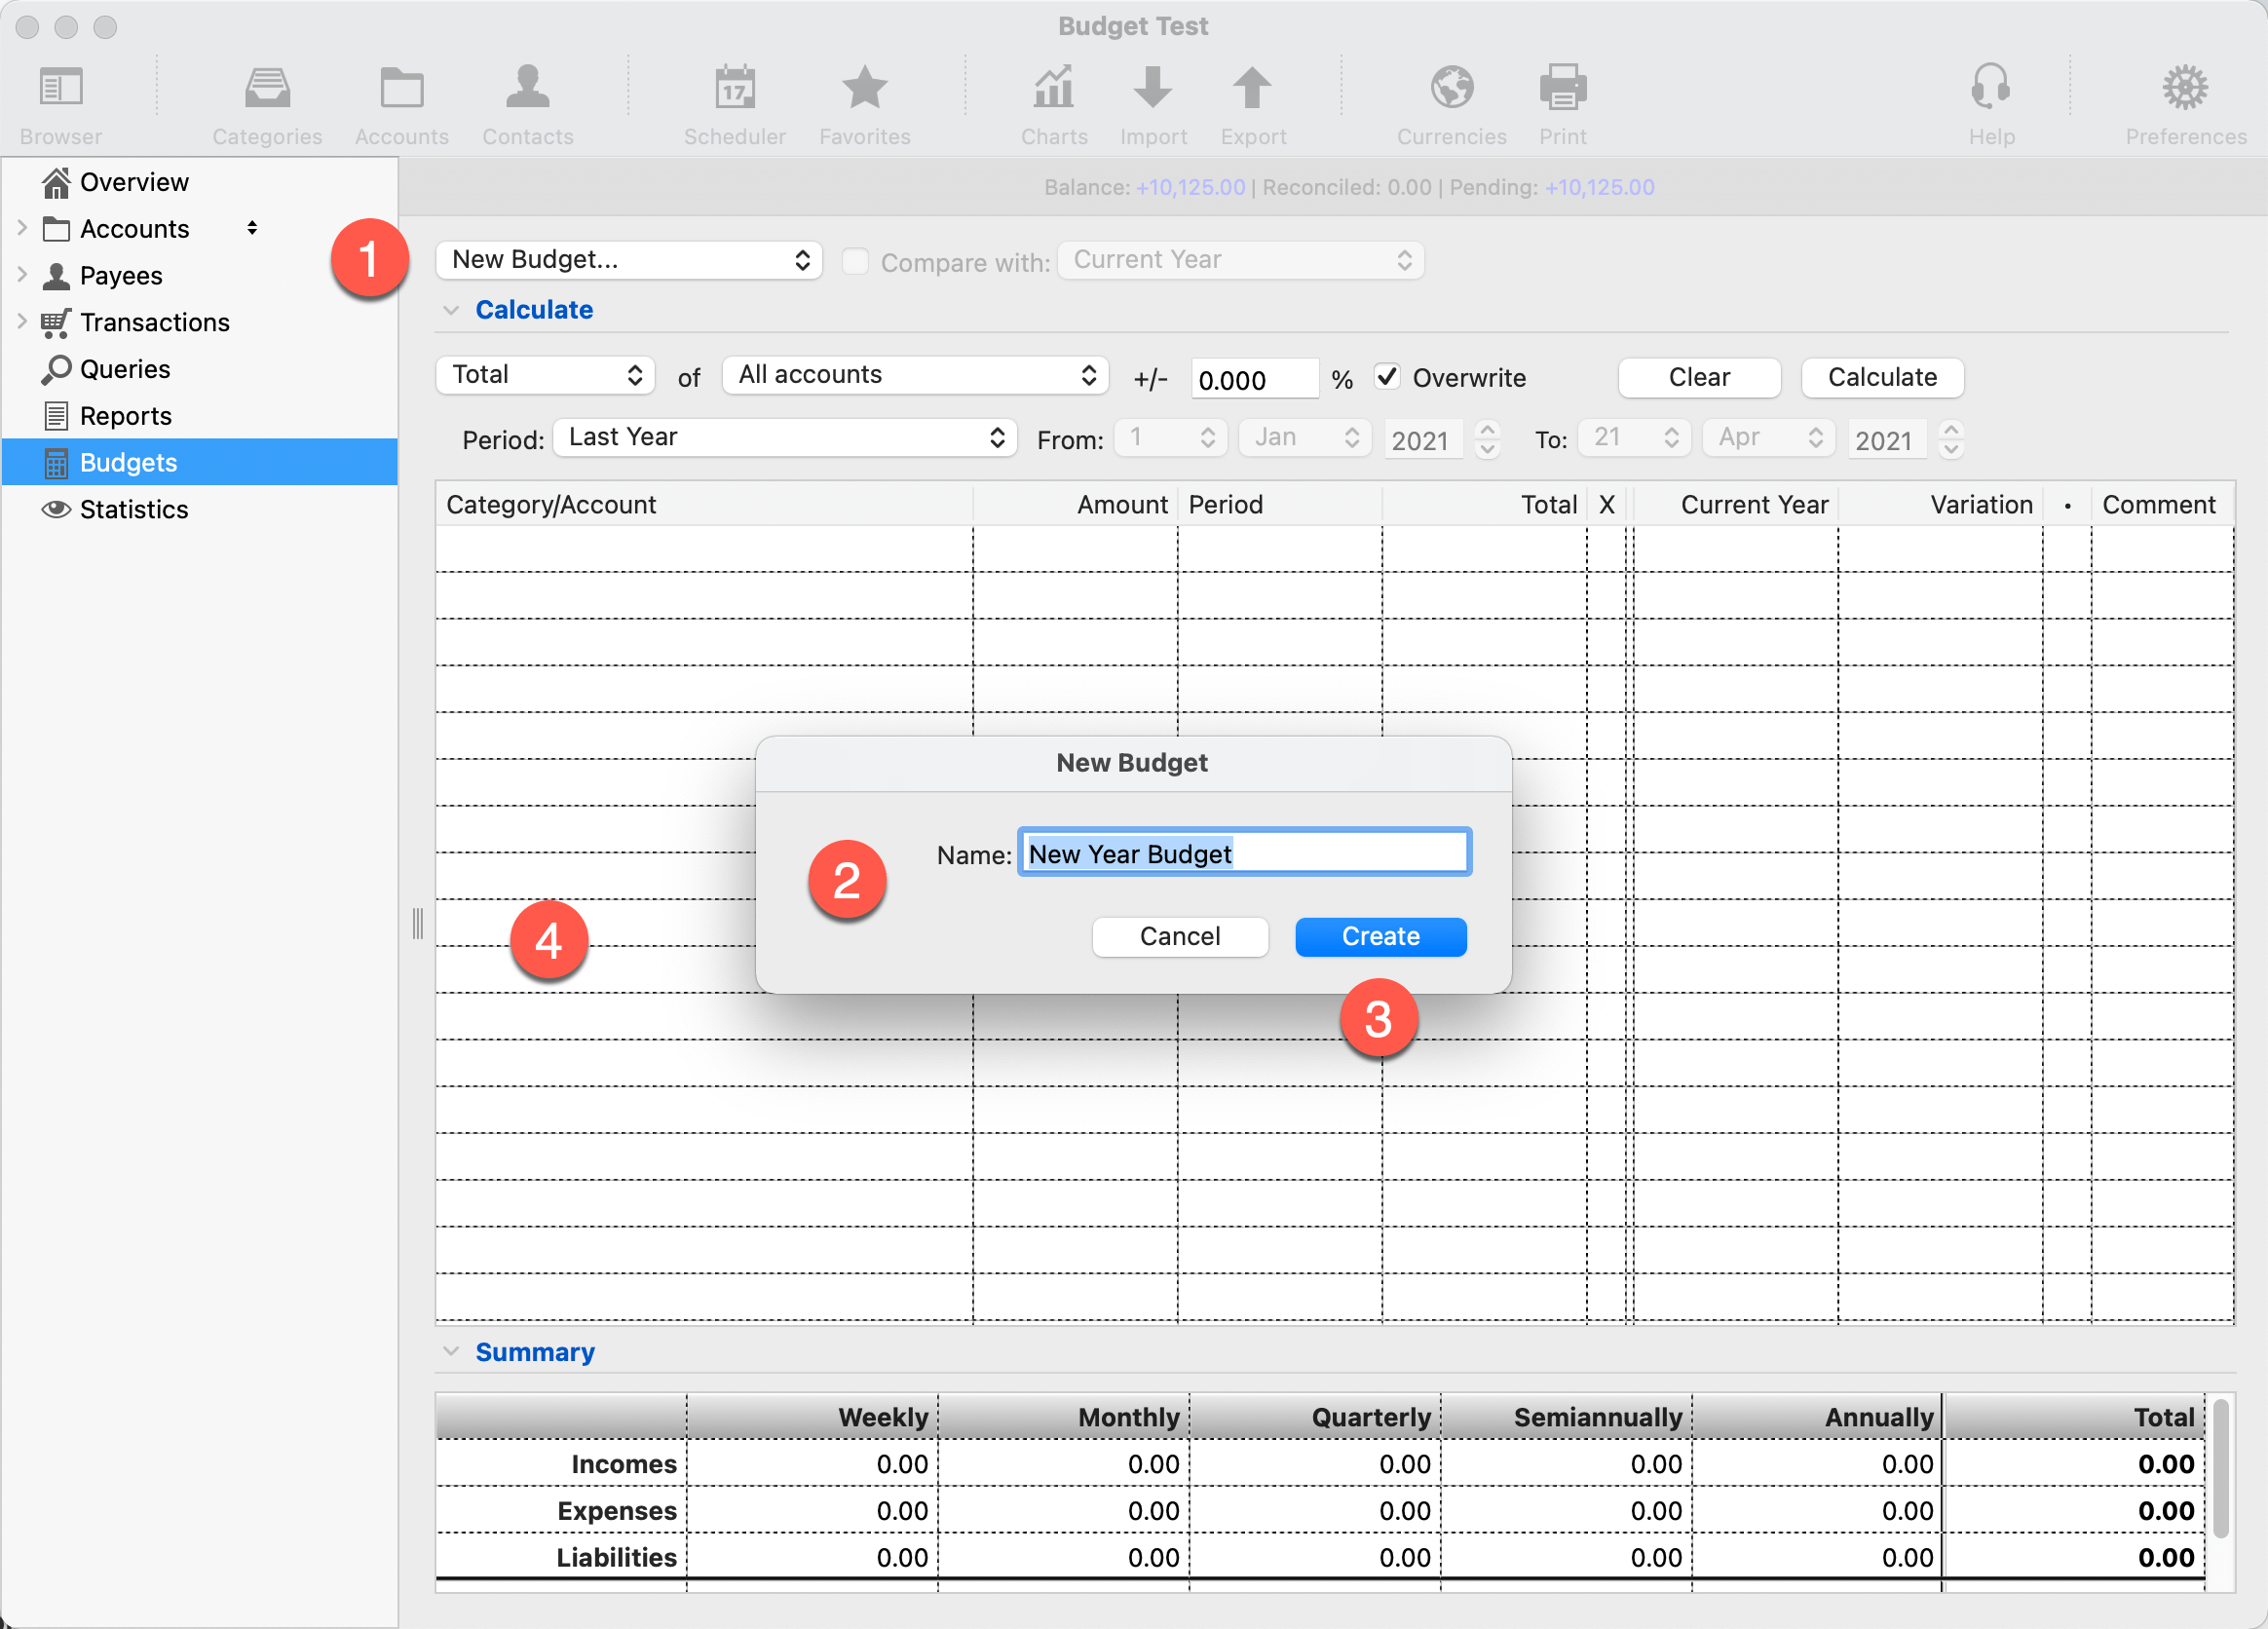
Creating a budget is easy, just select the New Budget menu from the Budget pull-down (1), give a unique name to the budget (2), and click on the Create button (3). The Budget is created, selected, and added to the budget pull-down menu.
The budget editor (4) is then automatically filled up with your current accounts ordered hierarchically and grouped by types (Incomes and Expenses) and categories. You can then edit each entry individually by changing the amount, the period, and activating or deactivating it.

Note that the budget pull-down menu not only lists all the budgets you create but also a few interesting menus as well. You can indeed delete or rename budgets. You can even duplicate an existing budget. It is quite handy when trying to create several scenarios based on previous ones.
The Budget Panel
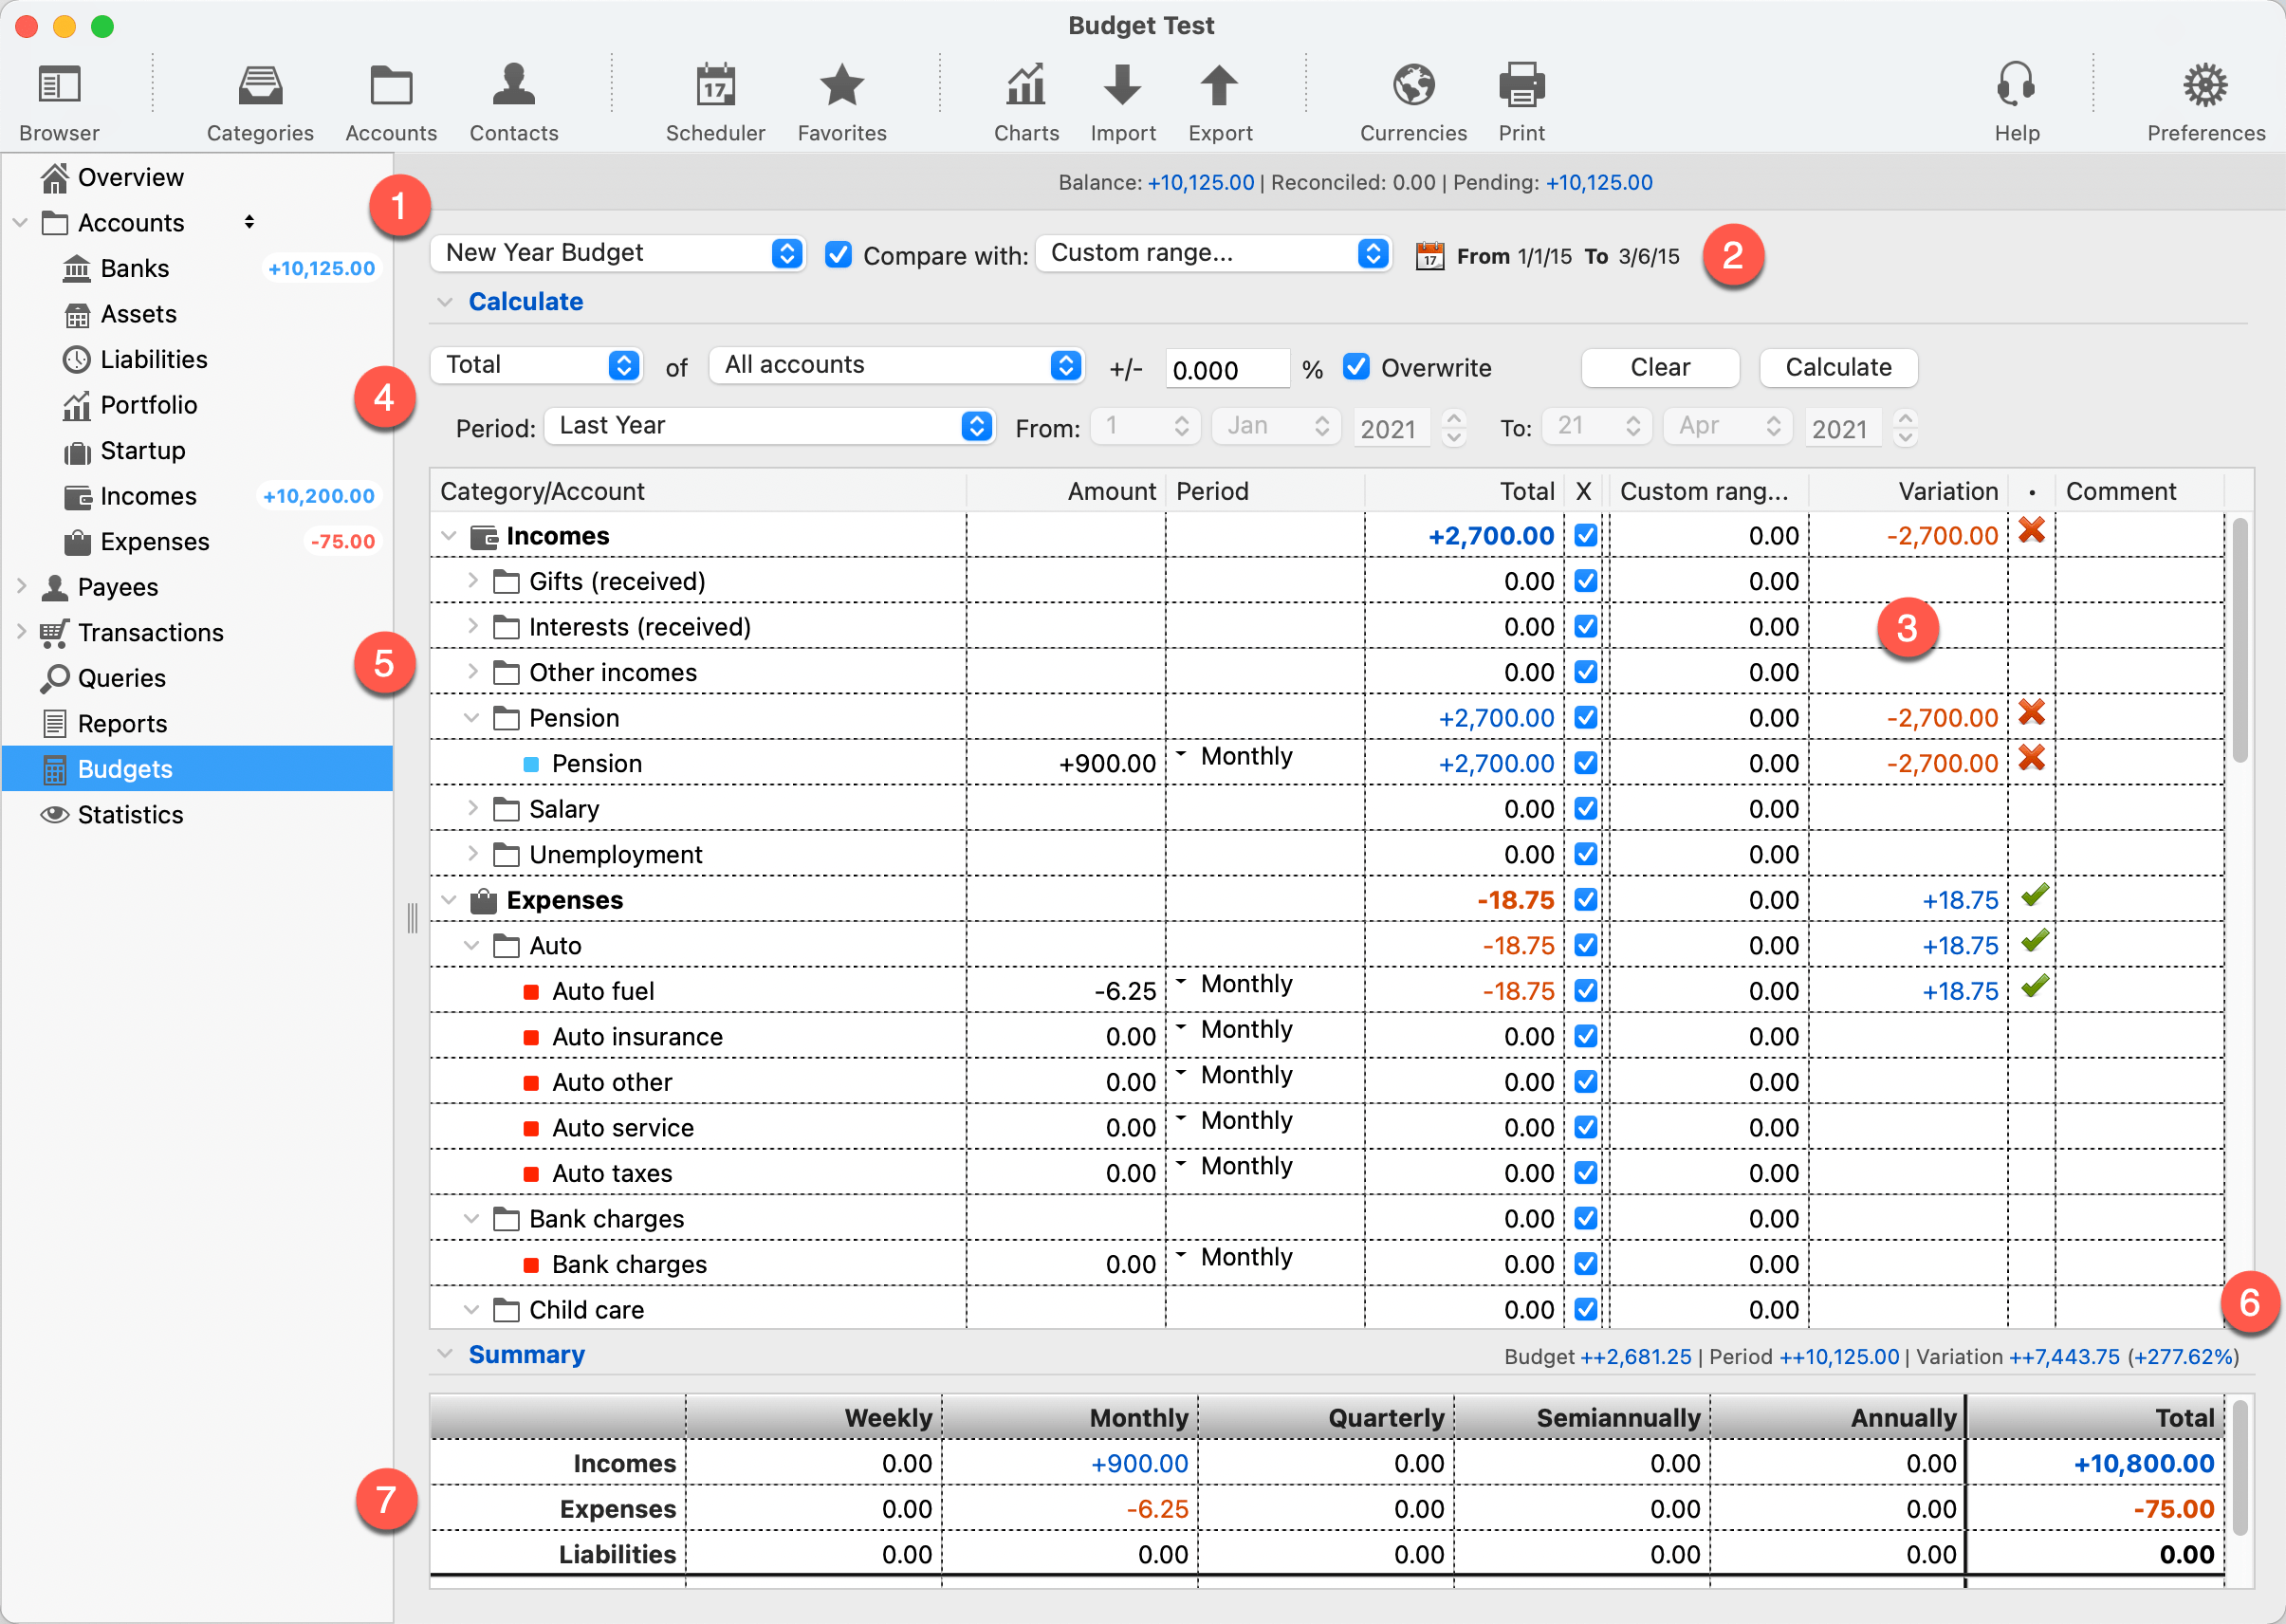
The Budget pull-down menu (1), as seen above allows you to open, delete, rename and duplicate budgets.
A budget is even more useful if you compare it with actual data (2), current year, a given month or quarter. Actually whatever period you wish, even a custom date range. Select a period. The two last columns on the right (3) will display the computed amounts and the deviation/difference with your budget numbers.
If you are lazy just make iCash calculate the budget numbers using previous data (4). That is a good starting point. Just take advantage of the data you already have for the period of your choice.
The budget editor (5) is the place where you actually set or modify numbers and see their impact. As we said in the introduction, the budget editor works mostly as a spreadsheet with built-in formulas and instant access to your data. The budget summary shows the totals (6) and offers a quick view of your numbers organized by category and period (7).

Note that you can export a budget to a text file or an Excel sheet. Of course, you can also send it to your printer.
Calculating the budget (optional)
This is not a required step but iCash provides a very easy way to fill the budget with the results of an automated estimation. Indeed, iCash can take your actual transactions for a given period of time.
The idea is simple, you ask iCash to enter all amounts for all the accounts and categories using a previous period. Just press the disclosure triangle to make the calculation panel visible. A bunch of controls enables you to set how the calculation has to be performed, which accounts to include and which transactions to use.
You can choose to compute the total or average (1) Incomes/Expenses for a selected set of accounts (2). You can increment or decrement the results by a given percentage (3), replace previous values with new ones (4), and select a period for that calculation (5).

Editing the budget numbers
Select an account of your choice, click in the amount field directly in the list (1), and enter the number. Then set the period (2) that amount corresponds to between Weekly, Monthly, Quarterly, Semiannually, or Annually.
The total is automatically computed and displayed (3) depending on the comparison period for the account, the category, and the account type. On the right, you can immediately see the selected period totals (4) and how they compare to your budget (5).

In the example above we expected $900 monthly but we actually got $10'800 in the last 3 months, that is -$600. On the other hand, we expected to spend $75 in gas and we actually spend $75, so we get a '=' sign. We also expected to spend $100 monthly on clothing but we finally spent $0, as a result, the variation is +$300. That means we have saved $300.
Only account values are editable, category and type entries are computed totals. The period works like a multiplier taking into account the current date and the comparison period. In the example above the Total column shows 3 months total because we selected 'Monthly' and we are in March. We also selected the corresponding comparison date range, we created this example on March 6th.
The Summary
Below the account list is the Summary information. It shows Incomes and Expenses totals along with grand totals for each period of time. This summary is automatically updated as soon as you make changes to the account list. Deactivating an entry will remove its associated amount from the summary. That allows you to temporarily deactivate entries and create "what if?" scenarios.


Comments